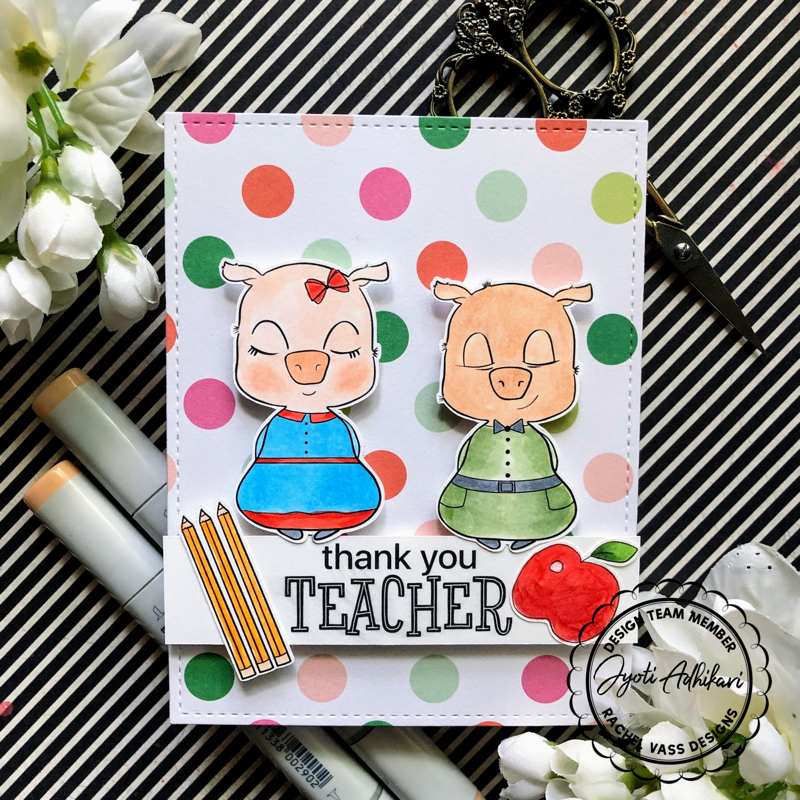
Today I am sharing this Thank You Teacher card featuring Rachel Vass Designs release called Piglets in School.
Schools are almost over for a long summer break here in United States. Due to the Covid19 kids here in New York are doing online classes. Amidst all these uncertainties and chaos we still need to be thankful to all the teachers that have dedicated their lives to these little kids.
This card is to express gratitude to those teachers.
Here’s my card for today
This release consists of these cute piglets and some beautiful sentiments unlike the usual floral stamp releases. I have always loved coloring floral images and making cards with them but these piglets are so adorable. I enjoyed coloring them with Copic Markers.
The girl piglet I colored with a lighter skin color and a little blush on her cheeks.
The boy had a little darker skin. I colored their clothes in colors that match with this polka dot patter paper I picked for the background.
The piglets are adhered on the background with foam tapes for dimension.
The sentiment ‘Thank You Teacher’ is also from the same digital stamp which is printed and cut in a strip.
This kind of brings some of the memories of my elemnetary school days with me and my twin brother going to shcool .
I hope you liked this cute and colorful card I made. Hope this will enspire you.
Here is another cards featuring releases by Rachel vass.
For this card, I had this fun color combination in my mind. Yellow and blue. But I wanted something unique so I went with blue for the center of the flowers and yellow for the petals.
I started coloring centers of the flowers using Copic colors in blue shades, B02, B04, and B06.
For the petals, I picked Y12, Y15, and Y17. For a little bit of depth in the center, I used E11.
I then matted that square piece with black card stock.
The Background
For the background of this card, I stretched the otherwise square stamp into a rectangle of 4 inches by 5 and a quarter inches which is slightly smaller than a regular A2 size card.
I colored the background panel using cool gray shades of Copic Markers. C3, C5, and Colorless Blender to blend Them all. I used Prismacolor pencils in 50% cool gray for extra depth in those black and white looking flowers.
Then I matted that panel with black card stock and mounted it on a top folding A2 card base. I added glossy accent to the center of the flower.
The Sentiment
The sentiment for this card came from the same digital stamp set. I loved the sentiment which is in white on black. They are all Thank You sentiments.
The Second Card
The Focus
For this second card, I wanted to color it in ombre. Since I owned a few different shades of Copic markers in reds, I picked all of them.
The center of the card is light and as it goes towards the edge of the card it becomes darker and darker. Vignette is the exact term.
For the darkest red shade which is the background behind the flowers I used G17 first and used R39 on top of it to make it even darker.
Hello! Today I have three thank you cards to share with you. Here’s my project for today which consists of three cards in different shapes, sizes, and coloring techniques using the Simon Says Stamp Beautiful Flower 2 Stamp and Die set. I asked my followers on Instagram if I used too much gold and 98% said no, so I went with gold and was happy with how it turned out.
The First Card
For this project I wanted to use a craft and gold combination which I think is perfect for a fall and Thanksgiving theme.
The Focal Point:
I stamped the largest stamp from the stamp set on watercolor paper with Ranger Archival in in jet black. Then I watercolored the image with Prima Watercolor palette in tropical. Blue and purple for the flowers and green, brown and yellow for the leaves. It was cut using the coordinating die. I used the whole image in this card.
The Background:
This first card measures 8 and a 1/2 by 3 and 3/4. I know it is a very tall card but it fits perfectly in any regular letter size envelope. The background is embossed using Spellbinders Embossing Folder and I rubbed Versamark Watermark Ink lightly on the raised area of the embossing. Then I sprinkled it with gold embossing powder and heat set it to melt the powder to give it a metallic look. I had to emboss the craft card stock twice aligning the pattern because this panel was too tall for the embossing folder.
The Sentiment:
The sentiment was from the same stamp set embossed with gold embossing powder on black card stock and layered on craft card stock strip.
I adhered the flower on the background with foam tapes and did the same with the sentiment. Finally I matted the gold embossed panel on a black card stock layer and attached the whole panel on the card base.
Here’s a close up look on the background. It was a lot of work but it looked amazing.
The Second Card:
This thank you card measures 6 by 6 inches but it is a gate fold card which means it opens from the middle.
The Focal Point:
For this card I stamped the same image with Memento Tuxedo black ink and colored using Copic colors; reds for the flowers and greens for the leaves. I decides to cut the image in two along the middle and use it as two images. First I was thinking about making it a Christmas card so I decided to go with red, gold, and green. But instead I made a thank you card.
The background:
For this one I wanted to go with the easier route so I just used one of the leopard print foiled pattern paper. I received this pattern paper with one of the Simon Says Stamp card kit a while back which I had been saving for a special card. Looks like this was it.
The Sentiment:
I wanted these cards to look like a series, so I stuck with the same sentiment. It’s stamped and embossed in gold on a black card stock strip.
Here’s the card when slightly opened. I really loved this combination.
The Third Card:
This third thank you card is totally different. I had a leftover piece of card stock measuring 4 and 3/4 by 11 inches. I scored it widthwise at 4 and 3/4 and 9 and 1/2 to create a square card. The remaining 1 and a 1/2 inches was used to fold a flap on top. I know this is a weird size, but I loved how it turned out.
The Focal Point:
For this one I wanted to no-line pencil color the image stamped on Antique Linen Distressed Ink. This ink is very light so you can’t see the outline after you finish coloring which is known as no-line coloring. I colored the image using different shades of red, yellow, and blue Inktense Pencils. Greens and yellows were used for the leaves. This really gives the image a fall vibe.
The Background:
Here again the background was one of the foiled-on craft chevron pattern paper from the same Simon Says Stamp card kit. If you own a chevron background stamp you can also stamp and emboss in gold to give it a similar look.
The Sentiment:
Just a simple thanks sentiment was adequate for this card because there is a lot going on.
On the closing flap I added the floral colored image, cutting the excess off the sides. I then adhered them to the chevron background.
This card doesn’t stand on it’s own unless stood on the side. Then I thought maybe I could attach the sentiment so it would be straight when I stood this card on its side.
I just love all these cards so much. Let me know what you guys think.