Hey crafty friends!
I’m excited to share a burst of color and whimsy with today’s post, featuring five cards I created using the Say Cheese Classic Mouse Collection from Spellbinders. This fun collection is full of cheerful sentiments, celebratory icons, and versatile dies perfect for birthdays, everyday encouragement, or just sending a smile. I’ve leaned into vibrant color combos and playful layouts to bring these dies to life—let’s dive into the details of each card!
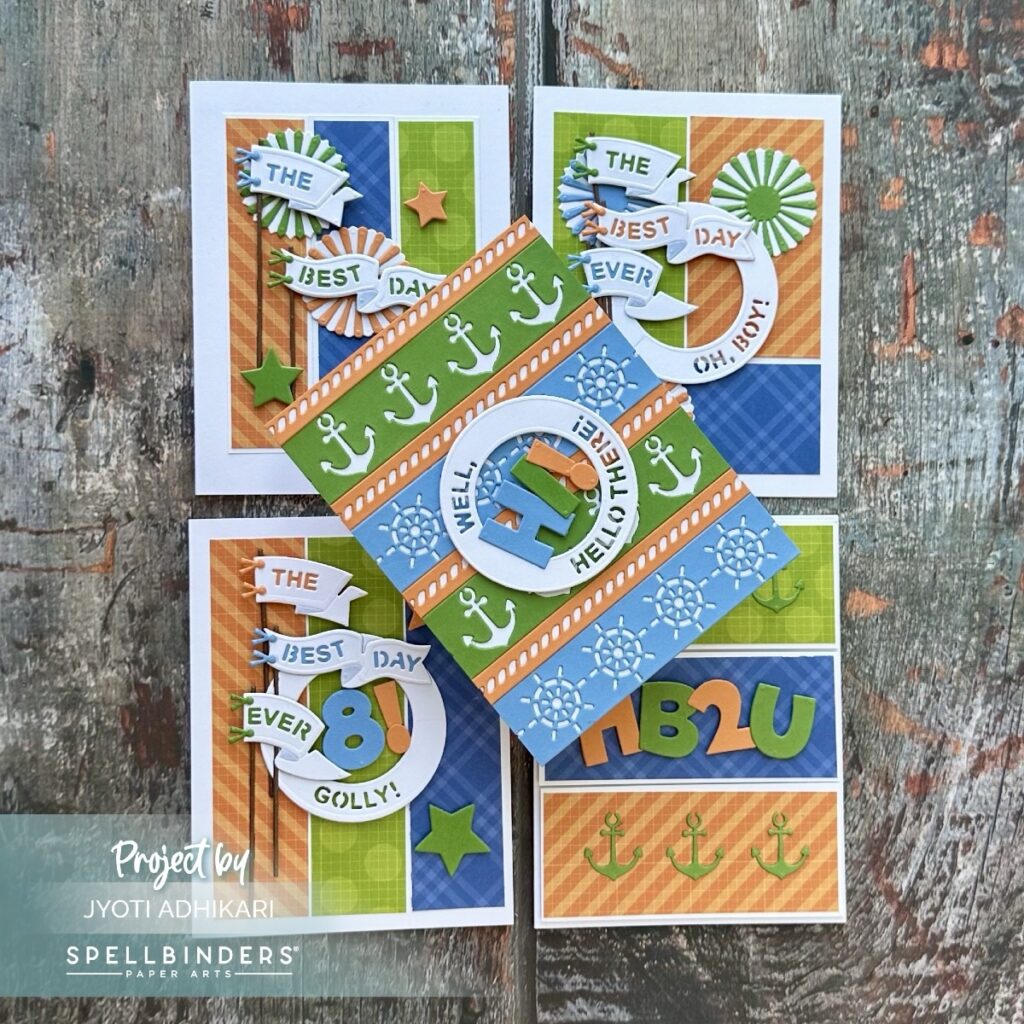
Card 1: Well, Hello There!
Building the Background
For this card, I chose a repeating nautical motif using cardstock in green, orange, and blue. I die-cut strips of anchors and ship wheels, then layered them horizontally across the card front. The addition of the braided rope detail on the orange strip gives a strong sailor-inspired vibe. I used the Classic Mouse Borders Die set for this.

Constructing the Sentiment
The central sentiment is built around the circular frame from Frames and Sentiments Die Set. I die-cut the ring in white along with the text “Well, Hello There!” around it. To make it pop, I added dimensional letters in blue, green, and orange, tilting them for a casual, conversational feel. The Hi! is from the Classic Alphabet Die set.

Adding Playful Layers
I popped up the sentiment ring using foam tape and centered it between the embossed strips so that it feels integrated but still stands out.

Finishing Touches
This card has a crisp and playful finish, perfect for summer mail or a nautical-themed hello. The balance of texture and clean die cuts makes it one of my favorites from this set!
Card 2: The Best Day Ever – Golly!
Creating the Background
This card began with three vertical patterned panels in orange, green, and blue. I love using tone-on-tone patterns like grids and plaids for subtle interest. These panels were adhered to a white base for a clean frame.

Fun with Flags
Next, I created a vertical stack of celebratory banners. I die-cut three flag shapes in white and layered them over brown poles. The words “THE,” “BEST,” “DAY,” and “EVER” are split across the flags using colored letters or diecut text.

Building the Centerpiece
The number “8” and exclamation mark take center stage inside the circle element, popped up for dimension. I also included the word “GOLLY!” at the bottom to complete the playful, energetic sentiment.

Star Accents
Finally, I added die-cut stars in green and orange to match the panels. This birthday card would be perfect for a child’s celebration or even a nostalgic adult card with that bold retro flair.

Card 3: HB2U
Background in Panels
For this simple but striking card, I opted for a vertical panel layout—green, blue, and orange pattern paper cut into thirds. The repetition brings harmony and makes the center sentiment shine.

Embossed Nautical Details
Each panel is decorated with green anchor diecuts for a subtle but dimensional texture. The tone-on-tone effect keeps it cohesive without feeling busy.

Bold Sentiment
I die-cut the large letters “HB2U” using orange and green cardstock. These chunky letters are from the Classic Mouse Alphabet Die Set and are mounted on foam for height and placed over the blue panel to anchor (pun intended!) the entire card.

Clean and Crisp Finish
This card came together quickly but still packs a punch. It’s perfect for a masculine birthday or for anyone who loves a nautical theme with a modern twist.

Card 4: The Best Day – Oh Boy!
Color Blocked Fun
I used a grid layout on this card, combining my favorite bold patterned papers—green, orange, blue, and white for the background . Each piece sets the stage for the next layer of decoration.

Pinwheels for Celebration
To break up the linear lines, I added three playful pinwheels—one in each colored block except white. I die-cut these using coordinating cardstock and layered a smaller circle in the center for dimension.

Banner Sentiment Stack
The sentiment banners run diagonally across the circle element, similar to previous cards. This one reads “THE BEST DAY” across stacked flags, with “OH, BOY!” curved around the circular frame.

Balancing Elements
The double poles holding the flags help visually ground the busy banners, and the layered pinwheels bring a festive feeling that screams celebration!

Card 5: The Best Day Ever (Layered Pinwheels Edition)
Striped Vertical Background
Like card two, I returned to a three-stripe vertical layout in orange, blue, and green plaid papers. This layout is a great base for grouping die cuts with intention and symmetry.

Dimensional Rosettes
Each stripe features a layered rosette in alternating colors—green/white, orange/white, and blue/white. These serve as backdrops to the sentiment banners, making each word pop.

Banner Parade
I die-cut the flag banners in white and added letters to spell “THE BEST DAY EVER,” with one word per rosette. It gives the look of a celebratory banner parade.

Star Accents for Balance
To finish it off, I added two large die-cut stars in orange and green, positioned in the opposite corners. The balance of shapes and playful typography makes this card feel full of energy and joy.

The Say Cheese Classic Mouse Collection by Spellbinders has been a blast to work with! I loved mixing bold colors, playful patterns, and dimensional dies to create a vibrant, cheerful card set. Whether you’re celebrating a birthday or just saying hello, this collection brings instant joy to your craft desk.
Let me know which card is your favorite—or how you’d use this collection in your next project!
Hugs,
Jyoti
Classic Mouse Alphabets Shop at: SB | SC |
“Flags & Banners Shop at: SB | SC | ”
“Frame & Sentiments Shop at: SB | SC | ”
Classic Mouse Numbers and Punctuation Shop at: SB | SC | ”
Classic Mouse Borders Shop at: SB | SC |

